
This tutorial presents some basic photo editing that hopefully makes your images look better. Previous tutorials have been written for both Paint.NET and GIMP but this tutorial requires some plugins that are only available for GIMP. Similar plugins exists for both Paint.NET and Photoshop so it's not impossible to use this guide for those programs.GIMP if you intend to use this program. Then download GREYCStoration and install it. If you're on Windows Vista or Windows 7 go to C:\Users\"youraccountname"\Documents\.gimp-"versionnumber"\plugins\ and paste the GREYCStoration executable in this folder. Under Windows XP change Users to Documents and Settings. When you start GIMP GREYCStoration should be under Filters>Enhance>GREYCStoration.
First get hold of

First get hold of
Now open a photo in GIMP by either using File>Open... or by dragging an image into GIMP's main window. You have several options to zoom into your image: 1. keep the CTRL-key pressed down while scrolling makes you zoom in and out 2. Use the Zoom Tool in the Tool Box, holding down the CTRL-key while clicking makes you zoom out 3. Choose a zoom percentage at the bottom of the main window. The picture that I've opened looks like this (cropped to 100%) and as you can see there is some noise:
Now go to Filters>Enhance>GREYCStoration. A dialogue will pop up a preview windows and many sliders. The sliders I tend to use the most are Strength and Noise Scale. For this image I found that the default noise scale value was good enough but the strength value was a bit too high. Using all default values and a strength value of 30 I got this result:
which clearly has less noise than the original.
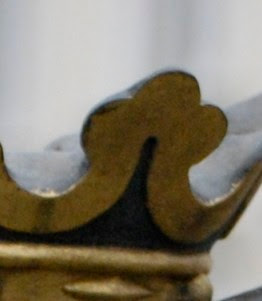
Now you want to sharpen the image. This doesn't make blurry images sharp but this tool makes a sharp image even sharper by enhancing local contrasts. Go to Filters>Enhance>Unsharp Mask... and again you are met by a box with a preview windows but less sliders. 80% of the time I use the standard settings but sometimes I make the radius smaller (say 4.0 px) and increase the amount a bit. When your done this image will look like this at a 100% crop:
At a 100% crop it might actually look worse than the original but when you compare a whole image to a noise cleaned, sharpened cropped one, you will see that the original almost looks a bit hazy compared to the edited one.
Hope this was some help to get your photos stand out. Next time I will show you how to use gradients to make an object stand out.
No comments:
Post a Comment