
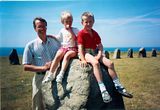
Happy New 2009! I have always liked Pin-Up Posters so why not start the new amazing 2009 with a short tutorial on how to get that 50's look. For this tutorial you need Paint.NET or GIMP. If you decide to use Paint.NET you will have to download Ed Harvey's Plugin Pack). If you are really into Posterizing and its effect download Posterize in HSV Space. In this tutorial I have posted example images to guide you along.
- Open the picture you want to edit and duplicate so you have two identical layers.
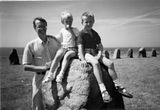
- Select the top layer and desaturate it (in Paint.NET: Adjustments>Black and White and in GIMP: Colors>Desaturate…)
- With the top layer selected increase the contrast and fiddle a bit with the brightness too. You want to keep the basic outlines and important shadows.
- With the top layer selected apply some Gaussian Blur (in Paint.NET: Effects>Blurs>Gaussian Blur… and in GIMP: Filters>Blur>Gaussian Blur…). You actually don't want the picture to look completely blurry but slightly softened. (Update1: You can also use some surface blur (Selective Gaussian Blur in GIMP) to soften the shadows)
- Press the eye button to the left of the top layer to make it invisible. Select the bottom layer and posterize it (in Paint.NET: Adjustments>Posterize… and in GIMP: Colors>Posterize…). I find that a value of around 10 works quite good but again it depends on the picture you are using.
- Now we need to use some surface blur to get rid of those sharp looking edges between colours. Surface blur keeps the detail (ie the borders) of an image and only blurs parts with similar colours. In Paint.NET: Effects>Blurs>Surface Blur… and in GIMP: Filters>Blur>Selective Gaussian Blur…. Now this layer should look painted.
- Select the top layer and make it visible again. In layer properties set the blending mode to Multiply. Adjust the opacity of the top layer to your liking.
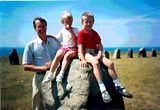
- The final touch is to give the picture the yellowish look associated with pin ups. Add a new layer and move it to the top. Choose a bright yellow colour of some sort. I used #FFE591 (in hex).
- Set the top most layer's blending mode to Multiply and adjust the opacity until you get the proper look.


You're done! If you want visit DaFont to download some 50's looking font and make your own 1950's ad!
No comments:
Post a Comment