2009-01-25

Song of January 2009

This month has been very electronic in my playlist selections. Massive Attack, Juno Reactor and Rob Dougan are some of the most frequent artists reoccurring on my mp3-player at the moment. Dark and evil songs about death should do fine for January of 2009 considering the war in Gaza and the economy crisis. But why not highlight the other big, hopefully happy, changes: president-elect Obama moves into the White House and it's my first term at university. So the song I've chosen is not Left me for Dead or Nitrogen but Divinity
by
The Future Sound of London

(formerly known as Amorphous Androgynous)(OPEN in Spotify). The song is from their album The Isness, which is probably their best album (available at iTunes Store). A strumming guitar (in major chords only to make it extra happy), a sitar, and other acoustic instruments are helped by electronic effects to produce something in the direction of world-electronic-music (I think alternative is implied).

I could have chosen many of the songs on this album, like Go Tell it to the Trees Egghead, or Meadows. But it is the vocals that make the song stand out. It's not that they're good or that they are advanced. It's rather the alternative singing appeals to me and can be found in Galaxial Pharmaceutical and Mello Hippo Disco Show.

If you don't like electronic or acoustic music this is not for you. If you on the other hand love acoustic and electronic music and you long for the summer and better times this is for you…

2009-01-21

I Do Not Know Anything About Companies but…

… isn't it strange that Sony Ericsson will fire 2 000 people although the company didn't do as bad as predicted in the fourth quarter 2008? What's even more disturbing is that Posten (Swedish Post) is charging one more SEK for every letter you send, while the CEO of Posten earns 900 000 SEK a month (~€83 211, £77 832 or $107 759). Last year Volvo fired 4 000 people but the CEO still rewards himself with 1.8 million SEK a month (~€166 423, £155 665 or $215 518). Skånetrafiken (responsible for public transport in southern Sweden) has increased prices by 2 SEK per trip (about 240 SEK more for my occasional trips but much more for commuters). Isn't that stupid to do since it's less expensive to take the car, thus polluting the air, thus contributing to global warming, and then the Earth explodes and we all die?

Something tells me they got it right in the East: Toyota cut the annual bonus of the 10 000 bosses in the company by 10% and reducing production in their luxury daughter company Lexus. Samsung will survive this economy crisis by cutting bosses wages with 20% and re-structure the company into two separate parts.

Why make the rich richer? How much is a CEO's work really worth? Aren't football players a bit overpaid too? And how much would you pay me to see me kick a leather ball in fishing net attached to white poles? Huh?!

2009-01-14

How to Take Photos of the Moon… with a Compact!

This will probably be my last tutorial before I move to Denmark. This will take some time to master and since clear skies are rare I reckon it will take some pictures before you have a decent photo of the moon. If you don't own a D-SLR, a telescope and a fitting adaptor this is what you'll need:

  • A compact camera, preferably with manual focus.
  • A pair of binoculars or a telescope.
  • Tripod.
  • Flashlight.
  • Optional: carton, tape, glue, rubber etc (in order to build your own adaptor ring; building instructions not included in this tutorial)
  • Patience.
  • Luck.

If you have all the above we are ready to roll. Put your camera on a tripod. If you use a telescope (which usually has its own tripod) try making an adapter ring that will hold the camera in place. Pair your camera with the binoculars/telescope. Use the built in zoom of your camera to get rid of vignette effects in the corners. If you are using binoculars the easiest way to focus is to use the cameras manual focusing to get the picture sharp. On a telescope you should be able to manually focus using a dial. Take a few test shots in daylight. Pray for clear skies and wait.

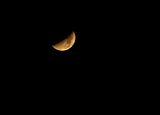
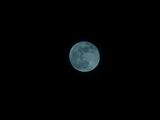
When there are clear skies and the moon is up (preferably at a low angle so you won't hurt your back) you are almost ready to take a picture of it. But before you direct your binoculars/telescope at the moon you have to do some more tweaking with your camera. If you have a full manual mode (noted M) you can manually set your exposure. For a full moon I can recommend a setting around 1/600 but for a half moon or less you are alright with 1/250. Remember that the exposure time may vary depending on the optics of the binoculars/telescope (since they let through different amounts of light; 7x50 lets through more light than 7x35 etc) and also how much sunlight is reflected from the moons surface (see below). If your camera hasn't got image stabilization of some sort you better use a timer so pressing the shutter won't spoil the picture. With some luck you just took a brilliant photo of the moon. It is more likely that your focus was a little off or that the camera or binoculars/telescope wasn't perfectly still during the exposure. Try again and again until you are satisfied or tired.

White Blob

If you don't have full manual control of your camera (which is a more likely scenario considering we are using compacts) we'll have to fool the camera into shortening its exposure time. This is easily done with a flashlight. With your camera manually focused to get a clear picture of the moon remove it from the binoculars/telescope. Direct your camera at the flashlight and half press down the shutter to get an exposure reading of around 1/600 for a full moon or around 1/250 for a half moon. With the shutter still pressed half down, pair the camera with the binoculars/telescope, direct your setup at the moon and press down the shutter. Tada. Chances are it didn't work or that you let go of the shutter button and that's why you need patience and loads of luck.

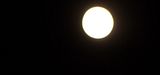
In order to encourage you not to give up you could visit my photo page on Picasa or click the images below to enlarge. If you look in the description you see that the exposure of the white blob was 1/61" and the exposure of the full moon was 1/60". This is because the blob was photographed when the moon was at a higher angle, which means more sunlight was reflected from the moon which in turn means more light into the camera and shorter exposures are needed to get a good detailed picture.

Come to think of it this was more of a project than a tutorial. You really have to experiment your way to good results. So have fun experimenting!


Moon
Full Moon

2009-01-10

17 Days till Lift Off


No, I am not going to be the first person in space (I am apparently 48 years too late). The metaphorical rocket I am writing about is going to somewhere a lot smaller than space, somewhere they speak a language resembling Swedish spoken with a swollen tongue and severe toothache, somewhere my money is worth much less: Denmark. Actually I am very excited about studying in Denmark. There will be cultural and language complications of course but I will finally have a life (get a life they told me but who's laughing now)!
This means I will have considerably less time to blog and I will probably rant more about dead bodies, blood and all the diseases I will discover I am suffering from. But don't worry I will definitely squeeze in some more photo tutorials and other stuff. As you might have noticed I have been very interested in photography lately and my interest will increase when I finally buy a D-SLR this summer. The reason I don't buy one now is simply that the D-SLR will act as bait and I will reward myself with it if I pass this year's exams!
In order to have something reoccurring to blog about I am going to use my other big interest: music. Each month I will post a song and a brief explanation of why this song is important to me. In the end of 2009 I will have posted 12 songs and maybe you can vote for your favourite. I haven't really thought this through but I am very excited.
Next up: How to take photographs of the moon… with a compact!

2009-01-01

Simple Pin-Up Effect

Happy New 2009! I have always liked Pin-Up Posters so why not start the new amazing 2009 with a short tutorial on how to get that 50's look. For this tutorial you need Paint.NET or GIMP. If you decide to use Paint.NET you will have to download Ed Harvey's Plugin Pack). If you are really into Posterizing and its effect download Posterize in HSV Space. In this tutorial I have posted example images to guide you along.

  • Open the picture you want to edit and duplicate so you have two identical layers.
    Original Photo
  • Select the top layer and desaturate it (in Paint.NET: Adjustments>Black and White and in GIMP: Colors>Desaturate…)
  • With the top layer selected increase the contrast and fiddle a bit with the brightness too. You want to keep the basic outlines and important shadows.
  • With the top layer selected apply some Gaussian Blur (in Paint.NET: Effects>Blurs>Gaussian Blur… and in GIMP: Filters>Blur>Gaussian Blur…). You actually don't want the picture to look completely blurry but slightly softened. (Update1: You can also use some surface blur (Selective Gaussian Blur in GIMP) to soften the shadows)
    B&W with Gaussian Blur
  • Press the eye button to the left of the top layer to make it invisible. Select the bottom layer and posterize it (in Paint.NET: Adjustments>Posterize… and in GIMP: Colors>Posterize…). I find that a value of around 10 works quite good but again it depends on the picture you are using.
  • Now we need to use some surface blur to get rid of those sharp looking edges between colours. Surface blur keeps the detail (ie the borders) of an image and only blurs parts with similar colours. In Paint.NET: Effects>Blurs>Surface Blur… and in GIMP: Filters>Blur>Selective Gaussian Blur…. Now this layer should look painted.
    Surface Blur
  • Select the top layer and make it visible again. In layer properties set the blending mode to Multiply. Adjust the opacity of the top layer to your liking.
  • The final touch is to give the picture the yellowish look associated with pin ups. Add a new layer and move it to the top. Choose a bright yellow colour of some sort. I used #FFE591 (in hex).
  • Set the top most layer's blending mode to Multiply and adjust the opacity until you get the proper look.
    Final Pin Up

You're done! If you want visit DaFont to download some 50's looking font and make your own 1950's ad!